Frequently Asked Questions
Dinosaur
If the indicator light flashes purple five times and the display shows "H1" this means the device is overheated. Please turn if the device and allow it to cool down before trying to use it again
If the indicator light flashes yellow and the display shows SC, this means there is a short circuit. Please try the following
1. Unscrew and take off the 710 coil. Use a Q-tip and some alcohol cleaner to clean any dirt or residue on the threaded end of the coil and the threaded hole of the Lookah vape.
2. Replace the coil and turn on the device to see if it now works.
3. If the fault remains, please try a different 710 coil to see if that resolves the fault.
4. if the fault remains, email the customer service team at support@lookah.com If possible, please include a picture or video showing the fault.
If the indicator light flashes yellow and the display shows OC, this means there is an open circuit. Please try the following
1. Unscrew and take off the 710 coil.
Use a Q-tip and some alcohol cleaner to clean any dirt or residue on the threaded end of the coil and the threaded hole of the Lookah vape.
2. Replace the coil and turn on the device to see if it now works.
3. If the fault remains, please try a different 710 coil to see if that resolves the fault.
4. if the fault remains, email the customer service team at support@lookah.com If possible, please include a picture or video showing the fault.
ANT
The "0" or "9" on the display screen indicates an open or short circuit issue. This can be caused if the thread is dirty or the atomizer coil is not making good contact.
1. Unscrew and take off the 710 coil.
Use a Q-tip and some alcohol cleaner to clean any dirt or residue on the threaded end of the coil and the threaded hole of the Lookah Ant.
2. Replace the coil and turn on the device to see if it now works.
3. If the fault remains, please try a different 710 coil to see if that resolves the fault.
4. if the fault remains, email the customer service team.
This indicates the device needs charging.
1. Please try charging the device with a known good USB cable and USB port.
2. If the fault remains, please email the customer service team.
This indicates the device is overheating. Please allow the device to cool before trying to use it again.
The digital display will flash while the device is charging, and the battery indicator lights will illuminate, indicating the charge.
When fully charged and still connected to the charging cable and port, all 7 segments of the battery indicator light will be illuminated.
The digital display will show all the segments illuminated, which looks like the number 8.
Seahorse
For cleaning the Seahorse you can use a non-needle syringe, sometimes called an oral syringe.
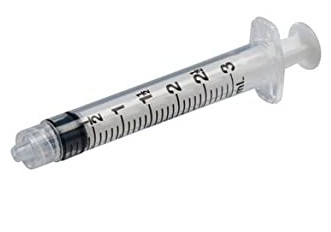
2. Use the syringe to squirt some isopropyl alcohol through the mouthpiece end. Only a little alcohol at a time.
3. Stand the seahorse pro upright/vertical (mouthpiece pointing up) in a cup or glass for a few minutes. This will allow the alcohol to work its way down the airpath.
4. Use a pipe cleaner, small brush, or Q-tip to clean around the inside of the mouthpiece.
5. The alcohol should dissolve the wax residue, and drip through, and come out of the end where the tip attaches.
6. Repeat steps 2 to 4 as needed.
5. After use the syringe to squirt some warm water through the device to rinse any of the alcohol away.
Please try the following steps:
1. Please check if the button can be pressed. It should click when pressed.
2. Press the power button 5 times in quick succession to turn on/off the device. The indicator light should flash white 3 times after.
3. If the indicator light did not flash, please try charging the device.
4. When connected to the USB charging cable, the LED light should be red to indicate charging.
5. After charging, press the power button 5 times to turn on the device, then press and hold the power button and test if the coil gets hot.
If the indicator light flashes yellow 5 times when you press the power button then this indicates an open circuit problem. Sometimes this can be if the tip or cartridge isn't on correctly if it was screwed on too tight.
Please also try the following steps:
1. Unscrew (anticlockwise) and take off the coil, use a Q-tip and some alcohol cleaner to clean any dirt or residue on the 510 thread end of the coil and the 510 thread hole of the seahorse.
2. Replace the coil by screwing it (clockwise) into the threaded hole.
3. Turn on the device and test if it now works.
4. If the indicator light still flashes yellow, please try another new coil to see if it resolve the issue.
If the indicators light flashes yellow 10 times when you press the power button then this indicates a short circuit problem.
Please try the following steps:
1. Unscrew (anticlockwise) and take off the coil, use a Q-tip and some alcohol cleaner to clean any dirt or residue on the 510 thread end of the coil and the 510 thread hole of the seahorse pro.
2. Replace the coil by screwing it (clockwise) into the threaded hole.
3. Turn on the device and test if it now works.
4. If the indicator light still flashes yellow, please try another new coil to see if it resolve the issue.
Please try the following steps:
1. See if the indicator light is flashing, take note of what color light.
2. Please check if there is any damage or problems with the charging port and USB cable.
3. If the charging port is dirty, clean with alcohol.
4. Try an alternative USB charging lead and USB charging socket.
The red flashing light indicates low remaining power. Please try the following steps:
1. Please charge the device for about 2 hours, check the LED indicator light is red when charging?
Note: The device can not be used during the charging process.
2. Press the power button 5 times to turn the device off while charging.
3. After charging try to turn on the device.
The coil is a consumables goods and will wear out in time, depending on how often it is used.
If it has worn out or is broken, please replace it with a new one.
Seahorse Pro Plus
Please try the following steps:
1. Please check if the button can be pressed. It should click when pressed.
2. Press the power button 5 times in quick succession to turn on/off the device. The indicator light should flash white 3 times after.
3. If the indicator light did not flash, please try charging the device.
4. When connected to the USB charging cable, the LED light should be red to indicate charging.
5. After charging, Press the power button 5 times to turn on the device, then press and hold the power button and test if the coil gets hot.
Please try the following steps:
1. Please check if the button can work fine. Does the LED indicator light show when turning on/off the device? Do the indicator light work when pressing the power button?
2. Unscrew (anticlockwise) and take off the coil. Use a Q-tip and some alcohol cleaner to clean any dirt or residue on the 510 thread end of the coil and the 510 thread hole of the seahorse pro plus.
3. Replace the coil by screwing it (clockwise) into the threaded hole.
If the indicator light flashes yellow 5 times when you press the power button, then this indicates an open circuit problem.
Please try the following steps:
Sometimes this can be if the tip or cartridge isn't on correctly if it was screwed on too tight.
1. Unscrew (anticlockwise) and take off the coil. Use a Q-tip and some alcohol cleaner to clean any dirt or residue on the 510 thread end of the coil and the 510 thread hole of the seahorse pro plus.
2. Replace the coil by screwing it (clockwise) into the threaded hole.
3. Turn on the device and test if it now works.
4. If the indicator light still flashes yellow, please try another new coil to see if it resolves the issue.
5. When cleaning the Seahorse Pro be careful not to unscrew the inset screw at the center of the 510 threaded section where the tip/coil attaches.
If this screw is not securely in place, the vape will register a circuit error when the power button is pressed. Please ensure this screw is tight, secure and after cleaning.
If the indicator light flashes yellow 10 times when you press the power button, then this indicates a short circuit problem.
Please try the following steps:
1. Unscrew (anticlockwise) and take off the coil. Use a Q-tip and some alcohol cleaner to clean any dirt or residue on the 510 thread end of the coil and the 510 thread hole of the seahorse pro.
2. Replace the coil by screwing it (clockwise) into the threaded hole.
3. Turn on the device and test if it now works.
4. If the indicator light still flashes yellow, please try another new coil to see if it resolves the issue.
5. When cleaning the Seahorse Pro Plus, be careful not to unscrew the inset screw at the center of the 510 threaded section where the tip/coil attaches.
If this screw is not securely in place, the vape will register a circuit error when the power button is pressed. Please ensure this screw is tight, secure and after cleaning.
The red flashing light indicates low remaining power. Please try the following steps:
1. Please charge the device for about 2 hours. Check the LED indicator light is red when charging.
Note: The device can not be used during the charging process.
2. Press the power button 5 times to turn the device off while charging.
3. After charging, try to turn on the device.
You can buy all the accessories for the Seahorse Pro Plus on our online headshop: www.lookah.com. where we sell atomizers, coils, glass tubes.
The coil is a consumable good and will wear out in time, depending on how often it is used.
To ensure the tips last as long as possible, make sure you fully burn all the concentrates off the tip after each dab.
If you leave concentrates on the tip or inside the airways it will harden and possibly ruin or wear out the coil prematurely.
Please do not insert the cleaning brush into the airway of the coils as this can damage them.
If it has worn out or is broken, please replace it with a new one.
1. To use a 510 cartridge with the Seahorse Pro Plus please ensure you have turned off the Seahorse Pro first and the tip is not hot.
2. Unscrew the tip/coil and then screw on your 510 thread cartridge.
3. You can then turn on the seahorse pro and vape from the mouthpiece pressing the button as you do so to vaporize the content of your cartridge.
You can see an example in this video : Seahorse Pro 510 Cart Video
Cleaning the Seahorse Pro Plus is the same as cleaning the Seahorse Pro.
Please see the video guide on how to clean a Seahorse Pro dab pen :
Cleaning the Seahorse Pro Video 1
Cleaning the Seahorse Pro Video 2
Cleaning steps
1. Remove the heating tip/coil
2. Remove the glass mouthpiece
3. Use a q-tip or paper towel with some isopropyl alcohol to clean the mouthpiece, then rinse the mouthpiece with warm water and dry it.
4. Dip the cleaning brush or a pipe cleaner in a little isopropyl alcohol, then insert it into the air path and twist to remove the residue in the Seahorse pro. Repeat the method again with a little warm water.
5. Use the cleaning brush or a q-tip to clean around the thread on the Seahorse Pro Plus device.
Seahorse 2.0
1. Remove the heating tip/coil.
2. Unscrew the magnetic ring around the 510 thread of the Seahorse 2.0
3. Remove the collar around the thread exposing the airway.
4. Remove the magnetic mouthpiece.
5. Dip the cleaning brush or a pipe cleaner in a little isopropyl alcohol then insert into the air path and twist to remove the residue in the Seahorse pro. Repeat the method again with a little warm water.
6. Use the cleaning brush or a q-tip to clean around the thread and mouthpiece on the Seahorse 2.0
7. Ensure the parts are dry and then put back together.
Please try the following steps:
1. Please check if the button can be pressed. It should click when pressed.
2. Press the power button 5 times in quick succession to turn on/off the device. The indicator light should flash white 3 times after.
3. If the indicator light did not flash, please try charging the device.
4. When connected to the USB charging cable, the LED light should be red to indicate charging.
5. After charging, press the power button 5 times to turn on the device, then press and hold the power button and test if the coil gets hot.
If the indicator light flashes yellow 5 times when you press the power button, then this indicates an open circuit problem. Sometimes this can be if the tip or cartridge isn't on correctly if it was screwed on too tight.
Please also try the following steps:
1. Unscrew (anticlockwise) and take off the coil, use a Q-tip and some alcohol cleaner to clean any dirt or residue on the 510 thread end of the coil and the 510 thread hole of the seahorse.
2. Replace the coil by screwing it (clockwise) into the threaded hole.
3. Turn on the device and test if it now works.
4. If the indicator light still flashes yellow, please try another new coil to see if it resolves the issue.
If the indicator light flashes yellow 10 times when you press the power button, then this indicates a short circuit problem.
Please try the following steps:
1. Unscrew (anticlockwise) and take off the coil, use a Q-tip and some alcohol cleaner to clean any dirt or residue on the 510 thread end of the coil and the 510 thread hole of the seahorse pro.
2. Replace the coil by screwing it (clockwise) into the threaded hole.
3. Turn on the device and test if it now works.
4. If the indicator light still flashes yellow, please try another new coil to see if it resolves the issue.
Please try the following steps:
1. See if the indicator light is flashing, take note of what color light.
2. Please check if there is any damage or problems with the charging port and USB cable.
3. If the charging port is dirty, clean it with alcohol.
4. Try an alternative USB charging lead and USB charging socket.
The red flashing light indicates low remaining power. Please try the following steps:
1. Please charge the device for about 2 hours. Check the LED indicator light is red when charging.
Note: The device can not be used during the charging process.
2. Press the power button 5 times to turn the device off while charging.
3. After charging, try to turn on the device.
The coil is a consumables goods and will wear out in time, depending on how often it is used.
If it has worn out or is broken, please replace it with a new one.
Seahorse X
Seahorse Max
If the indicator light flashes yellow 5 times when you press the power button then this indicates an open circuit problem. Sometimes this can be if the tip or cartridge isn't on correctly if it was screwed on too tight.
Please also try the following steps:
1. Unscrew (anticlockwise) and take off the coil. Use a Q-tip and some alcohol cleaner to clean any dirt or residue on the 510 thread end of the coil and the 510 thread hole of the seahorse.
2. Replace the coil by screwing it (clockwise) into the threaded hole.
3. Turn on the device and test if it now works.
4. If the indicator light still flashes yellow, please try another new coil to see if it resolves the issue.
If the indicator light flashes yellow 10 times when you press the power button then this indicates a short circuit problem.
Please try the following steps:
1. Unscrew (anticlockwise) and take off the coil, use a Q-tip and some alcohol cleaner to clean any dirt or residue on the 510 thread end of the coil and the 510 thread hole of the seahorse pro.
2. Replace the coil by screwing it (clockwise) into the threaded hole.
3. Turn on the device and test if it now works.
4. If the indicator light still flashes yellow, please try another new coil to see if it resolves the issue.
The red flashing light indicates low remaining power. Please try the following steps:
1. Please charge the device for about 2 hours. Check the LED indicator light is red when charging.
Note: The device can not be used during the charging process.
2. Press the power button 5 times to turn the device off while charging.
3.After charging, try to turn on the device.
To remove the Seahorse Max Glass hold the bottom of the vape unit in one hand and the glass bubbler in the other. Twist the glass part and base part of the vape in opposite directions while pulling them apart.
If the indicator light flashes blue when pressing the power button, this indicates an overload problem.
1. Unscrew (anticlockwise) and take off the coil. Use a Q-tip and some alcohol cleaner to clean any dirt or residue on the 510 thread end of the coil and the 510 thread hole of the seahorse pro.
2. If this screw is not securely in place, the vape will register a circuit error when the power button is pressed. Please ensure this screw is tight and secure after cleaning.
3. Replace the coil by screwing it (clockwise) into the threaded hole.
4. Turn on the device and test if it now works.
If the indicator light flashes blue when pressing the power button this indicates an overload problem.
1. Unscrew (anticlockwise) and take off the coil. Use a Q-tip and some alcohol cleaner to clean any dirt or residue on the 510 thread end of the coil and the 510 thread hole of the seahorse pro.
2. If this screw is not securely in place, the vape will register a circuit error when the power button is pressed. Please ensure this screw is tight, and secure after cleaning.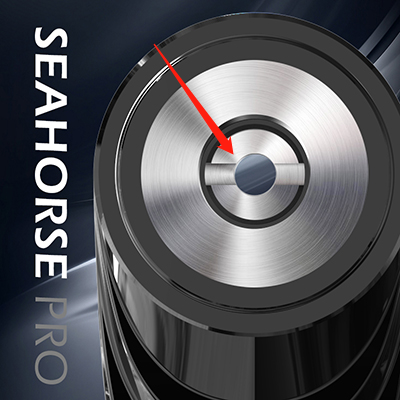
3. Replace the coil by screwing it (clockwise) into the threaded hole.
4. Turn on the device and test if it now works.
Cleaning steps

2. Remove the glass mouthpiece/percolator.
3. Use some isopropyl alcohol to clean the glass mouthpiece/percolator, then rinse the with warm water and leave to dry.
4. Dip the cleaning brush or a pipe cleaner in a little isopropyl alcohol then insert into the air path and twist to remove the residue in the Seahorse Max. Repeat the method again with a little warm water.
5. Ensure the parts are dry and then put back together, take care to line up the airway hole on the base of the glass and the Seahorse Max.
Seahorse Pro
Please try the following steps:
1. Please check if the button can be pressed. It should click when pressed.
2. Press the power button 5 times in quick succession to turn on/off the device. The indicator light should flash white 3 times after.
3. If the indicator light did not flash, please try charging the device.
4. When connected to the USB charging cable, the LED light should be red to indicate charging.
5. After charging, Press the power button 5 times to turn on the device, then press and hold the power button and test if the coil gets hot.
Please try the following steps:
1. Please check if the button can work fine. Does the LED indicator light show when turning on/off the device? Do the indicators work when pressing the power button?
2. Unscrew (anticlockwise) and take off the coil, use a Q-tip and some alcohol cleaner to clean any dirt or residue on the 510 thread end of the coil and the 510 thread hole of the seahorse pro.
3. Replace the coil by screwing it (clockwise) into the threaded hole.
If the indicator's light flashes yellow 5 times when you press the power button then this indicates an open circuit problem.
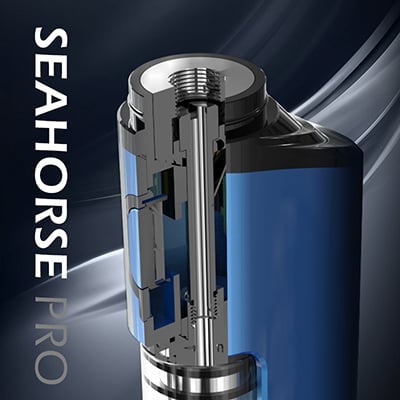
Sometimes this can be if the tip or cartridge isn't on correctly if it was screwed on too tight.
1. Unscrew (anticlockwise) and take off the coil, use a Q-tip and some alcohol cleaner to clean any dirt or residue on the 510 thread end of the coil and the 510 thread hole of the seahorse pro.
2. Replace the coil by screwing it (clockwise) into the threaded hole.
3. Turn on the device and test if it now works.
4. If the indicator light still flashes yellow, please try another new coil to see if it resolves the issue.
5. When cleaning the Seahorse Pro be careful not to unscrew the inset screw at the center of the 510 threaded section where the tip/coil attaches.
If this screw is not securely in place, the vape will register a circuit error when the power button is pressed. Please ensure this screw is tight, secure and after cleaning.
If the indicator light flashes yellow 10 times when you press the power button, then this indicates a short circuit problem.
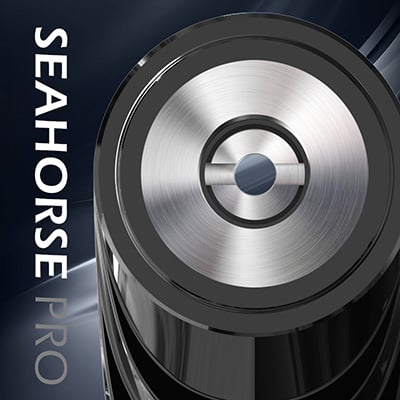
1. Unscrew (anticlockwise) and take off the coil. Use a Q-tip and some alcohol cleaner to clean any dirt or residue on the 510 thread end of the coil and the 510 thread hole of the seahorse pro.
2. Replace the coil by screwing it (clockwise) into the threaded hole.
3. Turn on the device and test if it now works.
4. If the indicator light still flashes yellow, please try another new coil to see if it resolves the issue.
5. When cleaning the Seahorse Pro be careful not to unscrew the inset screw at the center of the 510 threaded section where the tip/coil attaches.
If this screw is not securely in place, the vape will register a circuit error when the power button is pressed. Please ensure this screw is tight, secure and after cleaning.
The red flashing light indicates low remaining power. Please try the following steps:
1. Please charge the device for about 2 hours. Check the LED indicator light is red when charging.
Note: The device can not be used during the charging process.
2. Press the power button 5 times to turn the device off while charging.
3. After charging, try to turn on the device.
You can buy all the accessories for the Seahorse Pro on our online headshop: LOOKAH. where we sell atomizers, coils, glass tubes.
The coil is a consumables goods and will wear out in time, depending on how often it is used.
To ensure the quartz tip lasts as long as possible, make sure you fully burn all the concentrates off the tip after each dab. If you leave concentrates on the tip or inside the airways it will harden and possibly ruin or wear out the coil prematurely.
If it has worn out or is broken, please replace it with a new one.
1. To use a 510 cartridge with the seahorse pro please ensure you have turned off the Seahorse Pro first and the tip is not hot.
2. Unscrew the tip/coil and then screw on your 510 thread cartridge.
3. You can then turn on the seahorse pro and vape from the mouthpiece pressing the button as you do so to vaporize the content of your cartridge.
You can see an example in this video : Seahorse Pro 510 Cart Video
Please see the video guide on how to clean a Seahorse Pro dab pen :
Cleaning the Seahorse Pro Video 1
Cleaning the Seahorse Pro Video 2
Cleaning steps
1. Remove the heating tip/coil
2. Remove the glass mouthpiece
3. Use a q-tip or paper towel with some isopropyl alcohol to clean the mouthpiece, then rinse the mouthpiece with warm water and dry.
4. Dip the cleaning brush or a pipe cleaner in a little isopropyl alcohol then insert it into the air path and twist to remove the residue in the Seahorse pro. Repeat the method again with a little warm water.
5. Use the cleaning brush or a q-tip to clean around the thread on the Seahorse Pro device.
710 Coils
Please see this blog article on how to clean and maintain the 710 wax coils. How To Clean Your Lookah 710 Wax Pen Coils
The Python, Swordfish, Unicorn Mini, Q7 Mini, Seahorse X, and Dragon Eggs all use the same 710 coils.
All of these coils are quartz for a pure taste.
The 710 coils for the Lookah devices are similar but have a slightly differently shaped quartz plate inside, offering a heat profile and taste profile.
Type A - Best Taste - This coil has a wider plate which heats slower but more evenly. It has good 360-degree airflow. Overall it creates a smoother taste.
Type B - Best Vapor Production - The two holes in this coil lead to faster heat-up. The two holes in the coil expose the wax to a faster higher temperature creating more vapor.
Type C - Wax Saving - The square plate heats up evenly and has a directional airflow that draws across the top of it. This helps preserve the wax.
Type D - See Through - These coils are similar to the type B coils but have a seethrough side allowing you to check how much wax is in the vape without opening it up.
These are in packs of 5.
Type M packs are a mixed pack of 5 coils.
Type A:Click to buy Type A Coils
Type B:Click to buy Type B Coils
Type C:Click to buy Type C Coils
Type D:Click to buy Type D Coils
Seahorse Coils
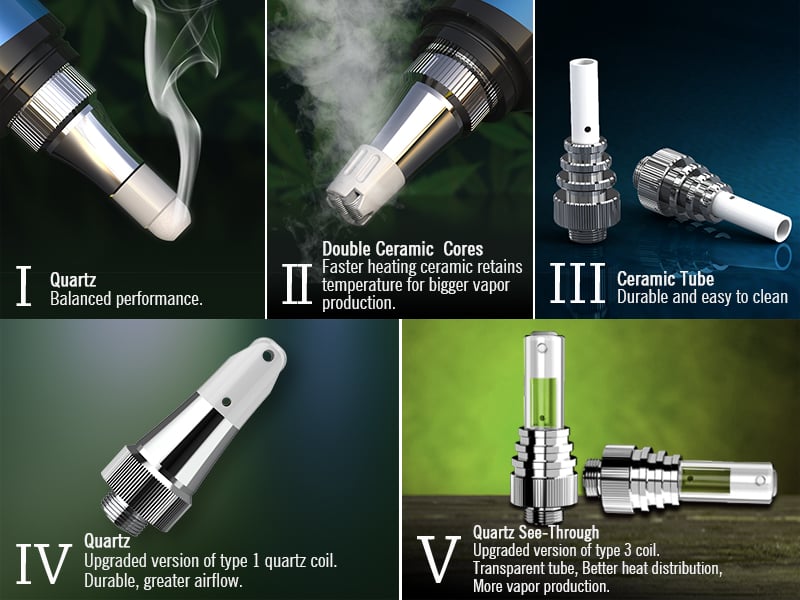
There are five types of Seahorse Coils.
Seahorse Coil-Ⅰ Quartz
Seahorse Coil-Ⅱ Ceramic
Seahorse Coil-ⅡⅠ Ceramic Tube
Seahorse Coil-ⅠV Quartz
Seahorse Coil-V Quartz
With both the seahorse tips, it's advisable to hold the vape at a 45-55 degree angle to the concentrate, use the edge of the tip to heat the concentrate, and be careful not to overload the tip as this can clog the tip and the device will vaporize more concentrate than what is needed.
HOW TO CLEAN THE COILS
To clean the coils run the session mode on high heat a couple of times, this heat will help burn off any excess wax in the coil.
It will also heat up any residue in the airway which can make it easy to remove with a toothpick after.
The coils can be washed in alcohol but don't leave them to soak in alcohol for too long, 5 to 10 minutes should be fine. It can be helpful to clear the airway if it is clogged.
Don't use the cleaning brush on the inside airway of the coils. It can damage them.
If the airway in the coil is clogged you can use some alcohol to soften the wax or use the session mode then pick the wax out with a toothpick.
Be sure to rinse the coil if you do soak it in alcohol and let it dry fully before using it.
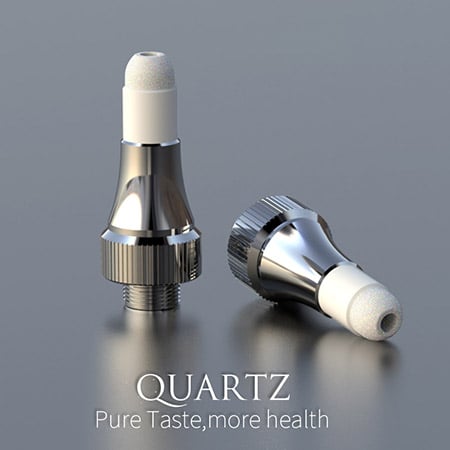
The quartz tip is porous with a wire coil inside to heat it up. Because it is porous, it is more delicate than the ceramic tip.
It heats up quickly and offers the best taste. When dabbing with the quartz coil, just set the desired temperature. When the tip is hot, place a small amount of wax or concentrates on the tip. Don't push the tip onto a hard surface as the delicate quartz coil could easily be damaged doing this, and it may break.
To ensure the tip lasts as long as possible, make sure you fully burn all the concentrates off the tip after each dab. If you leave concentrates on the tip or inside the airways, it will harden and possibly ruin or wear out the coil prematurely.
**Don't clean the quartz or ceramic tip with the cleaning brush or any liquids/solvents, as this can damage the tip.**
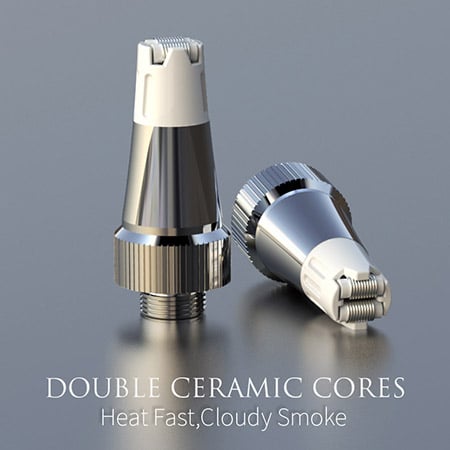
The ceramic tip has two small ceramic cylinders with a metal coil around them to heat them.
The ceramic tip holds the temperature for longer. The airway path between the two ceramic coils is smaller than the airway hole in the center of the quartz tip. Therefore, you are unlikely to suck up any small bits of wax with the ceramic tip.
The ceramic tips hold the temp for longer and are more durable, so you can gently press the hot end against the concentrate to vaporize it. Because stiffer concentrates are harder to break up and work with, the ceramic tip often works better with them as it can be heated and gently pressed against the concentrates to vaporize them.
To ensure the tip lasts as long as possible, make sure you fully burn all the concentrates off the tip after each dab. If you leave concentrates on the tip or inside the airways, it will harden and possibly ruin or wear out the coil prematurely.
**Don't clean the quartz or ceramic tip with the cleaning brush or any liquids/solvents, as this can damage the tip.**
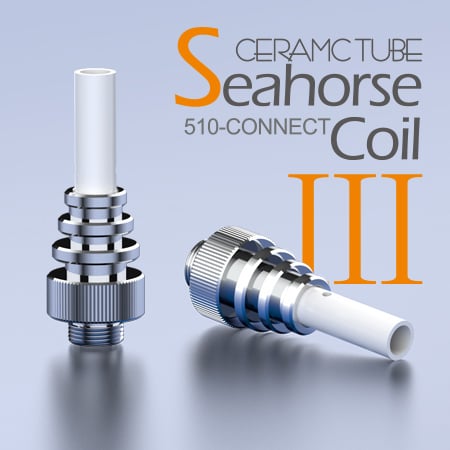
Lookah Seahorse Coil Ⅲ - Ceramic Tube 510 Thread Coil - Pack of 3 Coils
The Seahorse Coil Ⅲ is for the following devices only:
Lookah Seahorse Max
Lookah Seahorse 2.0
Lookah Seahorse Pro Plus
Lookah Seahorse X.
The coil will NOT work on the first-generation Seahorse or Seahorse Pro dab pens.
Ideal for cloud chases and those wanting big rips the Seahorse Coil Ⅲ brings greater vapor than the other quartz or ceramic Seahorse coils.
**To ensure the quartz tip lasts as long as possible, make sure you fully burn all the concentrates off the tip after each dab. If you leave concentrates on the tip or inside the airways it will harden and possibly ruin or wear out the coil prematurely. **
**To ensure the quartz tip lasts as long as possible, make sure you fully burn all the concentrates off the tip after each dab. If you leave concentrates on the tip or inside the airways it will harden and possibly ruin or wear out the coil prematurely. **
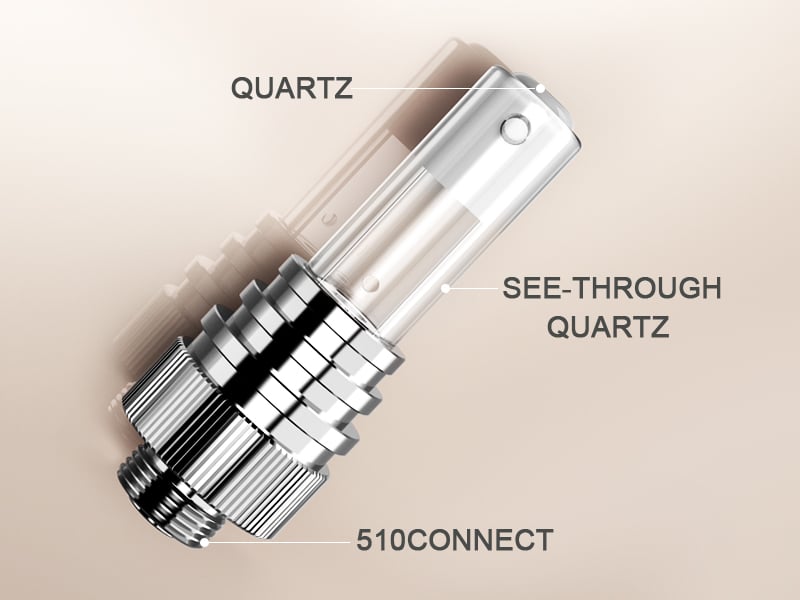
The Seahorse Type V coils have a porous quartz tip at the end of a quartz tube. They can be used on any of the Lookah Seahorse vape devices.
**To ensure the quartz tip lasts as long as possible, make sure you fully burn all the concentrates off the tip after each dab. If you leave concentrates on the tip or inside the airways it will harden and possibly ruin or wear out the coil prematurely. **
Swordfish
The red flashing light indicates low remaining power. Please try the following steps:
1. Please charge the device for about 2 hours. Check the LED indicator light is red when charging.
Note: The device can not be used during the charging process.
2. Press the power button 5 times to turn the device off while charging.
3. After charging, try to turn on the device.
The purple flashing light indicates high-temperature protection. Please allow the device to cool down before attempting to use it again.
If the indicator light flashes yellow 5 times when you press the power button, this indicates an open circuit problem.
Sometimes this can be if the 710 atomizer cartridge isn't on correctly if it is making a bad connection.
1. Unscrew (anticlockwise) and take off the 710 atomizer coil.
2. Use a Q-tip and some alcohol cleaner to clean any dirt or residue on the threaded end of the coil and the threaded hole of the device.
3. Replace the coil by screwing it (clockwise) into the threaded hole.
4. Turn on the device and test if it now works.
5. If the indicator light still flashes yellow, please try another new coil to see if it resolves the issue.
If the indicator light flashes yellow 8 times when you press the power button, this indicates a short circuit problem.
Sometimes this can be if the 710 atomizer cartridge isn't on correctly if it is making a bad connection.
1. Unscrew (anticlockwise) and take off the 710 atomizer coil.
2. Use a Q-tip and some alcohol cleaner to clean any dirt or residue on the threaded end of the coil and the threaded hole of the device.
3. Replace the coil by screwing it (clockwise) into the threaded hole.
4. Turn on the device and test if it now works.
5. If the indicator light still flashes yellow, please try another new coil to see if it resolves the issue.
To clean the Swordfish, please begin by removing the mouthpiece.
1. Unscrew the nut (turn anti-clockwise) that holds the mouthpiece in place.
2. Open the bracket
3. Remove the mouthpiece
To clean the mouthpiece, please remove it and soak it in warm water. To remove stubborn residue on the mouthpiece, use some isopropyl alcohol. Be sure to rinse and dry the glass mouthpiece thoroughly after cleaning.
Remove the quartz coil
1. Unscrew the 710 quartz atomizer and remove it.
Use a cotton bud and some isopropyl alcohol to clean around the thread on the Swordfish vape and around the thread on the 710 quartz coil.
The inside of the coil can be cleaned with a cotton bud.
Once cleaned, ensure the parts are dry and put back together.
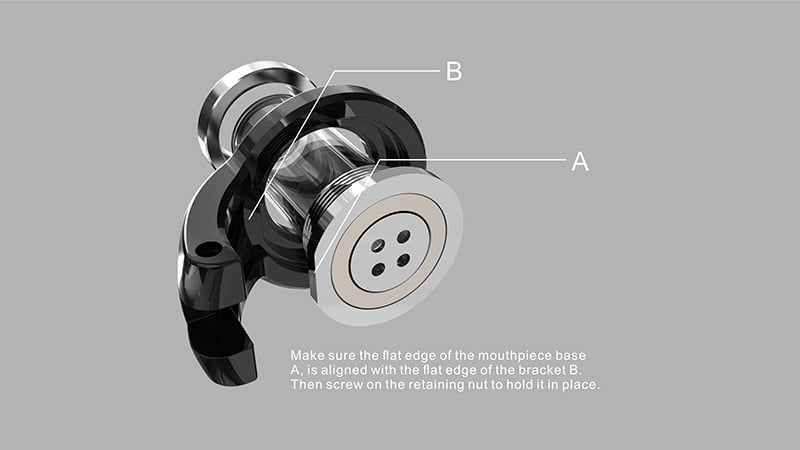
**Note: When changing the plastic mouthpiece on the Swordfish please take care not to lose the securing nut. **
1. Unscrew the nut (turn anti-clockwise) that holds the mouthpiece in place.
2. Open the bracket
3. Remove the mouthpiece
4. Insert the new mouthpiece, ensure the flat side, (labeled A in the picture) is lined up with the bracket (labeled B in the picture).
5. Screw on the retaining nut (turn clockwise)
Dragon Egg
1. Open the magnetic flip cap and place a small amount of wax into the center of the atomizer coil.
2. Close the flip cap.
3. Press the power button 5 times within 2 seconds to turn on the Dragon Egg. The device will vibrate.
4. The device will enter a preheat mode, and the display will show a countdown from 9 to 0 as the preheat is active. While in preheat mode, the light will flash between green, blue, and white.
5. After the preheat has finished, the light will flash 2 times, and the device will vibrate.
6. Press the power button 2 times to select the voltage mode. The device will vibrate, and the light will flash according to the voltage mode, which will also show on the display screen.
7. Press and hold the power button for up to 30 seconds to heat the atomizer and vaporize the wax. After 30 seconds of use, the light will flash, the device will vibrate, and it will enter standby.
8. As the device is heating the atomizer, you can inhale from the glass straw mouthpiece of the vape. As required, you can adjust the airflow by covering the carb on the flip cap.
Be sure to wipe around the atomizer to remove any excess wax and turn the device off after you have finished using it.
This indicates the device needs charging.
1. Please try charging the device with a known good USB cable and USB port.
2. If the fault remains, please email the customer service team.
The "0" or "9" on the display screen indicates an open or short circuit issue. This can be caused if the thread is dirty or the atomizer coil is not making good contact.
1. Unscrew and take off the 710 coil.
Use a Q-tip and some alcohol cleaner to clean any dirt or residue on the threaded end of the coil and the threaded hole of the Lookah Dragon Egg.
2. Replace the coil and turn on the device to see if it now works.
3. If the fault remains, please try a different 710 coil to see if that resolves the fault.
4. if the fault remains, email the customer service team.
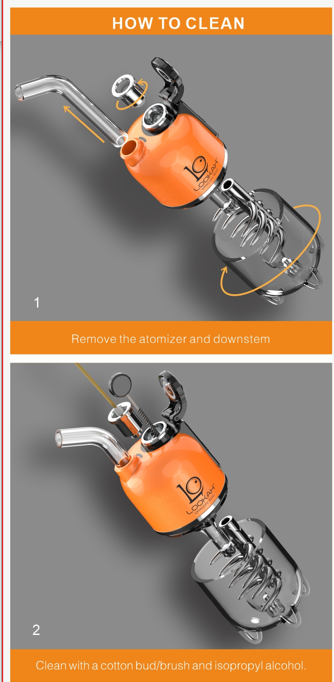
1. Remove the atomizer and mouthpiece. Unscrew the percolator base from the body.
2. Clean the airway and mouthpiece with a cotton bud/cleaning brush and some isopropyl alcohol.
3. The percolator can be cleaned with warm soapy water, be sure to rinse it well after cleaning.
DO NOT clean the plastic parts with isopropyl as this can cause the plastic to go cloudy.
4. The atomizer can be cleaned by wiping around it with a cotton bud and some isopropyl alcohol.
This indicates the device is overheating. Please allow the device to cool before trying to use it again.
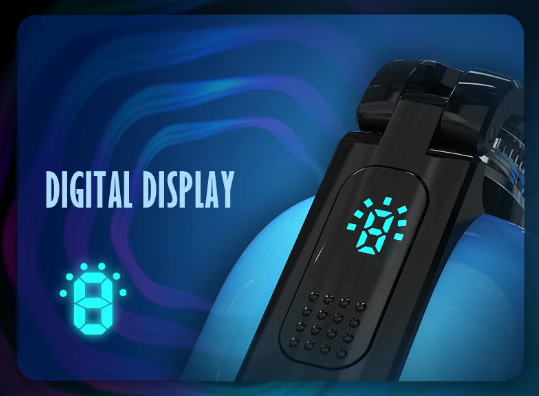
The digital display will flash while the device is charging, and the battery indicator lights will illuminate, indicating the charge.
When fully charged and still connected to the charging cable and port, all 7 segments of the battery indicator light will be illuminated.
The digital display will show all the segments illuminated, which looks like the number 8.
Unicorn Mini
The red flashing light indicates low remaining power. Please try the following steps:
1. Please charge the device for about 2 hours. Check the LED indicator light is red when charging.
Note: The device can not be used during the charging process.
2. Press the power button 5 times to turn the device off while charging.
3. After charging, try to turn on the device.
The purple flashing light indicates high-temperature protection. Please allow the device to cool down before attempting to use it again.
If the indicator light flashes yellow 5 times when you press the power button, this indicates an open circuit problem.
Sometimes this can be if the 710 atomizer cartridge isn't on correctly if it is making a bad connection.
1. Unscrew (anticlockwise) and take off the 710 atomizer coil.
2. Use a Q-tip and some alcohol cleaner to clean any dirt or residue on the threaded end of the coil and the threaded hole of the unicorn mini device.
3. Replace the coil by screwing it (clockwise) into the threaded hole.
4. Turn on the device and test if it now works.
5. If the indicator light still flashes yellow, please try another new coil to see if it resolves the issue.
If the indicator light flashes yellow 8 times when you press the power button, this indicates a short circuit problem.
Sometimes this can be if the 710 atomizer cartridge isn't on correctly if it is making a bad connection.
1. Unscrew (anticlockwise) and take off the 710 atomizer coil.
2. Use a Q-tip and some alcohol cleaner to clean any dirt or residue on the threaded end of the coil and the threaded hole of the unicorn mini device.
3. Replace the coil by screwing it (clockwise) into the threaded hole.
4. Turn on the device and test if it now works.
5. If the indicator light still flashes yellow, please try another new coil to see if it resolves the issue.
Unicorn E-Rig
Please remove the coil and test the device as shown.
Turn on the device by pressing the power button 5 times. 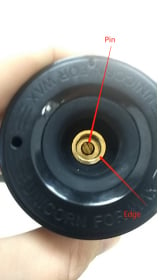
Place a conductive piece of metal, like a metal key or screwdriver, between the Pin in the center of the thread, and the Edge of the thread. 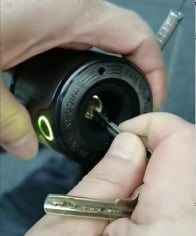
Press the power button and take note of how many times the light around the power button flashes yellow.
If the indicator's light flashes yellow 5 times and the device vibrates when you press the power button this indicates that the device could be defective.
Please send an email to support@lookah.com, stating the specific problem. Please include a picture or video showing the fault and a picture of the purchase receipt (or advise when and where you bought this device).
If the indicator light flashes yellow 10 times it indicates that the coils was broken or damaged. Please try the following steps:
1. Unscrew (anticlockwise) and take off the coil. Use a Q-tip and some alcohol cleaner to clean any dirt or residue on the thread end of the coil and the thread hole of the Unicorn e-rig.
2. Replace the coil by screwing it (clockwise) into the threaded hole.
3. Turn on the device and test if it now works.
4. If the indicator light still flashes yellow, please try another new coil to see if it resolves the issue.
Please try the following steps:
1. See if the indicator light is flashing, take note of what color light.
2. Please check if there is any damage or problems with the charging port and USB cable.
3. If the charging port is dirty, clean with alcohol.
4. Try an alternative USB charging lead and USB charging socket.
The purple flashing light indicates a temperature alarm.
The device will vibrate twice and turn off.
1. Please allow the device to cool down for 20 minutes before attempting to reuse it.
The red flashing light indicates low remaining power. Please try the following steps:
1. Please charge the device for about 2 hours. Check the LED indicator light is red when charging.
Note: The device can not be used during the charging process.
2. Press the power button 5 times to turn the device off while charging.
3. The light turns to cyan when the device is fully charged.
4. After charging, try to turn on the device.
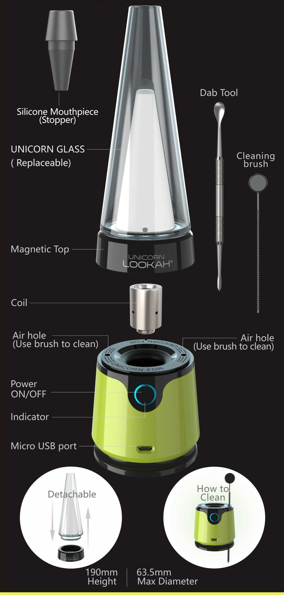
1)Remove the top part of the device with the glass bubbler and magnetic ring.
2) Remove the glass from the magnetic ring. See video Remove Unicorn Glass Video
3)You can clean the glass bubbler with some isopropyl alcohol and coarse salt.
4)Cover the holes on the base of the bubbler.
5)Put some salt in the bubbler; half fill it with isopropyl alcohol.
6)Put your hand over the top and shake well.
7)For persistent stains, you can soak the glass in alcohol.
8)Rinse the glass in water. Then leave to dry.
9)The magnetic ring and silicone insert can be cleaned in warm water.
You can remove the silicon insert when cleaning. See video silicon insert removal video
10) Remove the coil/atomizer from the vape.
11) Clean around the thread on the atomizer with some isopropyl and a q-tip.
12) Clean the two airway holes on the vape with the cleaning brush or a pipe cleaner and some isopropyl alcohol.
13) leave the parts to dry fully before assembling.
You can buy all the accessories for the Unicorn e-rig on our online
headshop: www.lookah.com where we sell atomizers and replacement glass cones.
Lookah Load & Firebee
The "0" or "9" on the display indicates an open or short circuit issue. This can be caused if the 510 thread is dirty or not making good contact.
1. Unscrew and take off the cartridge.
Use a Q-tip and some alcohol cleaner to clean any dirt or residue on the 510 thread end of the cartridge and the 510 thread hole of the Lookah Load.
2. Replace the cartridge and turn on the device to see if it now works.
3. If the fault remains, please try a different 510 cartridge to see if that resolves the fault.
4. if the fault remains, email the customer service team.
This indicates the device needs charging.
1. Please try charging the device with a known good USB cable and USB port.
2. If the fault remains please email the customer service team.
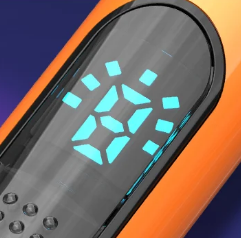
The digital display will flash while the device is charging, and the battery indicator lights will illuminate, indicating the charge.
When fully charged and still connected to the charging cable and port, all 7 segments of the battery indicator light will be illuminated.
The digital display will show all the segments illuminated, which looks like the number 8.
Snail Vape
Please try the following steps:
1. Unscrew (anticlockwise) and take off the cartridge. Use a Q-tip and some alcohol cleaner to clean any dirt or residue on the 510 thread end of the cartridge and the 510 thread hole of the snail.
3. Replace the cartridge by screwing it (clockwise) into the threaded hole.
4. Turn on the device and test if it now works.
5. If the indicator light still flashes yellow, please try another new cartridge to see if it resolves the issue.
Please try the following steps:
1. Unscrew (anticlockwise) and take off the cartridge. Use a Q-tip and some alcohol cleaner to clean any dirt or residue on the 510 thread end of the cartridge and the 510 thread hole of the snail.
2. Replace the cartridge by screwing it (clockwise) into the threaded hole.
3. Turn on the device and test if it now works.
4. If the indicator light still flashes yellow, please try another new cartridge to see if it resolves the issue.
Please try the following steps:
1. See if the indicator light is flashing, take note of what color light.
2. Please check if there is any damage or problems with the charging port and USB cable.
3. If the charging port is dirty, clean it with alcohol.
4. Try an alternative USB charging lead and USB charging socket.
Please try the following steps:
1. Unscrew (anticlockwise) and take off the cartridge. Use a Q-tip and some alcohol cleaner to clean any dirt or residue on the 510 thread end of the cartridge and the 510 thread hole of the snail.
2. Replace the cartridge by screwing it (clockwise) into the threaded hole.
3. Turn on the device and test if it now works.
4. Please check if the LED is flashing when it is on or charging.
Q7 Mini
1. Place the Q7 mini into the down stem of your water pipe.
2. Open the magnetic flip cap and place a small amount of wax into the center of the atomizer coil.
3. Close the flip cap
4. Press the power button 5 times within 2 seconds to turn on the Q7 Mini enail.
5. The device will enter a preheat mode, and the display will show a countdown from 9 to 0 as the preheat is active.
6. After the preheat has finished, the light will flash 2 times.
7. Press the power button 2 times to select the voltage mode.
8. Press and hold the power button for up to 30 seconds to heat the atomizer and vaporize the wax.
9. Inhale from the mouthpiece of the water pipe. As required, you can adjust the airflow by covering the carb on the flip cap.
10. Be sure to wipe around the atomizer to remove any excess wax and turn the device off after you have finished using it.
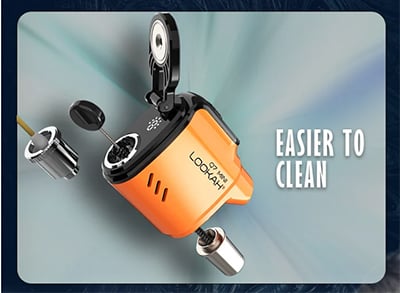
1. Open the magnetic carb lid
2. Remove the 710 atomizer by unscrewing it counterclockwise.
3. Remove the downstream by unscrewing it clockwise.
4. Use the cleaning brush and some isopropyl alcohol to clean the airway between the downstream and atomizer coil.
5. With some isopropyl and a Q-tip, swab out the area around where the 710 coils would screw into the device.
6. You can swab out the atomizer coil with a Q-tip after each session.
7. Clean around the carb cap and the body of the device with a damp cloth, and dry well after.
8. When dry, reassemble the parts.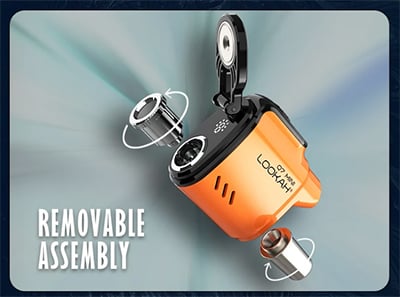
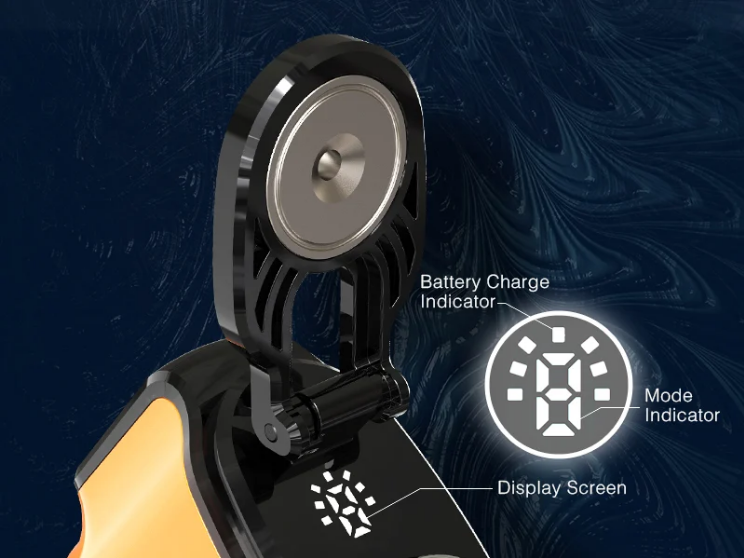
The digital display will flash while the device is charging, and the battery indicator lights will illuminate, indicating the charge.
When fully charged and still connected to the charging cable and port, all 7 segments of the battery indicator light will be illuminated.
The digital display will show all the segments illuminated, which looks like the number 8.
Q7 E-Nail
If the Q7 screen has frozen and the device will not respond when you press the buttons please try the following to see if it can be reset. At the same time, push and hold the - button and the power button for 10 seconds. This should go into reset mode. The device specification will show on the screen along with the hardware and software build info. Release the - button and the power button. The Lookah LO logo will display and then the device will power back on. It should now operate normally.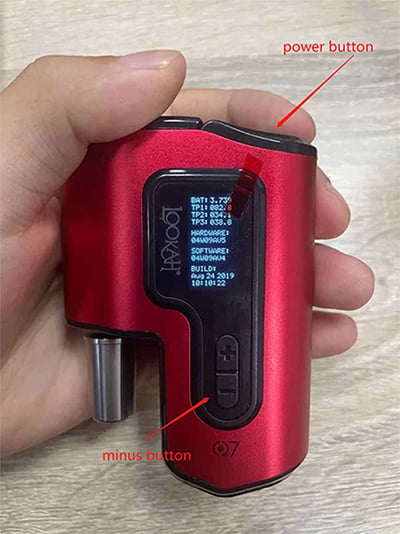
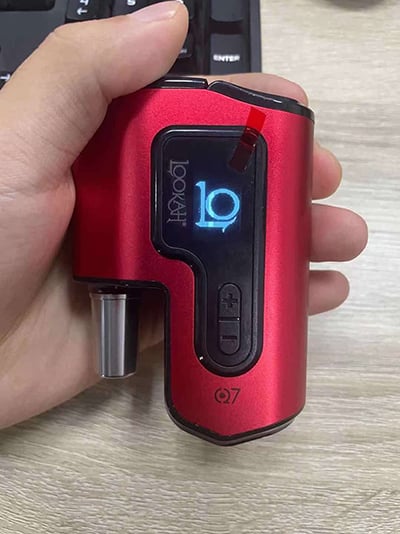
Please kindly try the following steps:
1. Please check if there is any damage or problems with the charging port and USB cable.
3. If the charging port is dirty, clean with alcohol.
2. See what information is shown on the display screen.
3. Please keep charging 2 hours, then to turn on again to see if it can work now.
Please clean/wipe with alcohol.
Please use a q-tip to clean the bowl of the Q7 after every use. This will prevent residue build-up, which, if left unattended, can clog the device and degrade the efficiency of the Q7.
The Q7 airflow is through the carb cap into the bowl chamber and then through the metal pipe that connects the Q7 to your water pipe.
If you experience a lack of airflow when you try to draw through the pipe, then the carb cap or the metal pipe from the bowl are likely clogged and need cleaning.
You can remove the metal pipe on the Q7, the part that sits in the downstem joint of your water pipe. To do this, unscrew the pipe from the bottom of the device.
Clean with a small nylon brush or q-tip and some isopropyl alcohol.
Dip the brush or q-tip in the alcohol and then use it to clean the metal downpipe and airflow hole on the Q7, which it connects to. Check out the video for details.
You can remove the carb cab by unscrewing it.
Press down on the top of the carb cap with your finger; with the other hand, unscrew the underside of the carb cap. Check out the video for details.
This will then come off in two pieces.
Clean with some isopropyl alcohol and a soft nylon brush or q-tip.
After cleaning, rinse it in water, dry it, and screw it back in place.
Q8 Wax Vape
If the Q8 screen has frozen and the device will not respond when you press the buttons please try the following to see if it can be reset. At the same time, push and hold the - button and the power button for 10 seconds. This should go into reset mode. The device specification will show on the screen along with the hardware and software build info. Release the - button and the power button. The Lookah LO logo will display and then the device will power back on. It should now operate normally.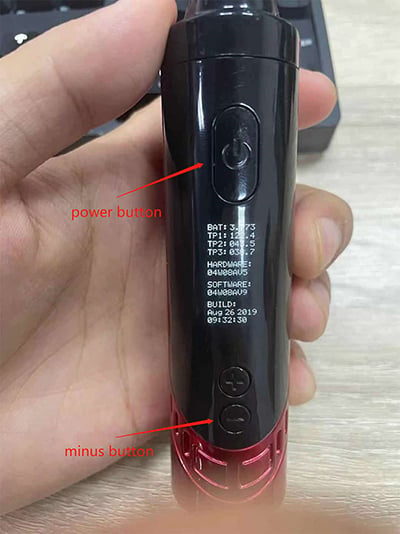
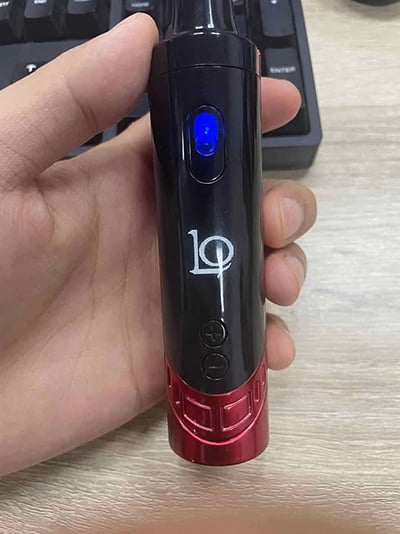
Please kindly try the following steps:
1. Please check if there is any damage or problems with the charging port and USB cable.
2. If the charging port is dirty, clean with alcohol.
3. See what information is shown on the display screen.
4. See what information is shown on the display screen.
1. (LOAD SC) - Short Circuit protection. Please email support if yous see this error.
2. (LOW BAT) Battery volume protection. Please charge the device.
3. (HSG HOT) Housing temperature protection. please discontinue use and allow to cool until using again.
4. (PCB HOT) Overheat temperature protection for the whole device. Please discontinue use and allow to cool until using again.
5. (SENSOR ERRROR) Real-time monitor. Please turn the device off. Wait 2 minutes and turn it back on to see if resolves.
1. Turn off the vaporizer before cleaning.
2. Remove the mouthpiece.
3. Use a q-tip or cotton bud to clean away excess residue in the heating chamber/dish.
4. You can dip the q-tip in isopropyl alcohol if you need to remove stubborn residue.
To remove the mouthpiece
1. Locate the two ribs on the back of the mouthpiece.
2. Place a finger on here and a thumb on the front of the mouthpiece.
3. Pull the mouthpiece forwards to remove it.
To replace the mouthpiece.
1. Sit the mouthpiece on the top of the Q8.
2. Push down on the back while pushing in from the front.
The mouthpiece should sit nice and flush when in place correctly.
Giraffe
If the indicator light flashes yellow/green 5 or 10 times when you press the power button, then this indicates an open or short circuit problem. Sometimes this can be if the tip or cartridge isn't on correctly if it was screwed on too tight.
Please also try the following steps:
1. Unscrew (anticlockwise) and take off the coil, use a Q-tip and some alcohol cleaner to clean any dirt or residue on the 510 thread end of the coil and the 510 thread hole of the Giraffe.
2. Replace the coil by screwing it (clockwise) into the threaded hole.
3. Turn on the device and test if it now works.
4. If the indicator light still flashes yellow/green, please try another new coil to see if it resolves the issue.
If the indicator light flashes blue when pressing the power button, this indicates an overload problem.
1. Unscrew (anticlockwise) and take off the coil. Use a Q-tip and some alcohol cleaner to clean any dirt or residue on the 510 thread end of the coil and the 510 thread hole of the vape.
2. If this screw is not securely in place, the vape will register a circuit error when the power button is pressed. Please ensure this screw is tight and secure after cleaning.
3. Replace the coil by screwing it (clockwise) into the threaded hole.
4. Turn on the device and test if it now works.
Please try the following steps:
1. See if the indicator light is flashing, take note of what color light.
2. Please check if there is any damage or problems with the charging port and USB cable.
3. If the charging port is dirty, clean it with alcohol.
4. Try an alternative USB charging lead and USB charging socket
Glass Water Bong Water pipe bongs
1. We suggest you open the package in front of the courier. If you find the glass broken, you can complain directly to the shipping company, also send an email containing the order number, the pictures/videos, and description of the problem to support@lookah.com, we will assist to resolve it.
2. If you already signed for it, could you please contact your location shipping company for an "incident number", Send that together with your order number, the picture/video showing the problem parts, and describe the problem in an email to:support@lookah.com, we will follow-up to process this for you. You can see our full warranty and returns policy here:LOOKAH returns and exchanges
The water level should be about 1/2 to 1 inch (1.5 to 2.5cm) above the water pipe's percolator(s)/downstem. You can check this blog article for more info on how to find the water levels for different bongs & dab rigs.
If you are not sure, please feel free to contact: support@lookah.com. Provide us with the SKU number of your product, and we will provide you with details.
Unfortunately, we can't offer the option to choose the color due to the way our fulfillment center is set up. For the glass water pipes and pieces the color shipped is selected randomly.
For a full step by step guide on how to clean your glass water pipe please read the article on our blog "How to clean a glass bong"
If you want to get reclaim from your dab rig then try our article "How do you get reclaim from a dab rig"
You can also see this short video guide "How to clean a bong"
If you have broken a glass water pipe, all may not be lost.
There are some ways to fix the pipe yourself, which we outlined in the following blog article. How to fic a broken bong
There is also a list of a few professional glass repair places at the end of the article.
Other
Locate the sticker on the packaging of your device.
Scratch off the silver "scratch me" patch to reveal a 16 digit number.
Visit the verification webpage LOOKAH Product Verification
Enter the 16 digit number and click the verification button.
If you have any questions, please contact our customer service team.
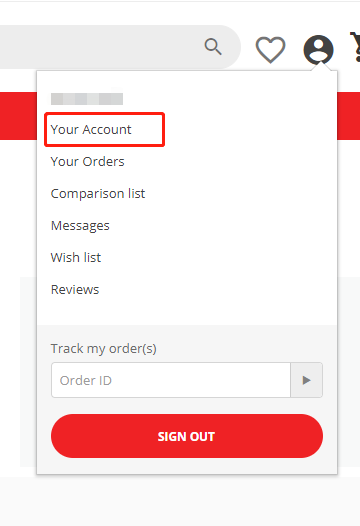
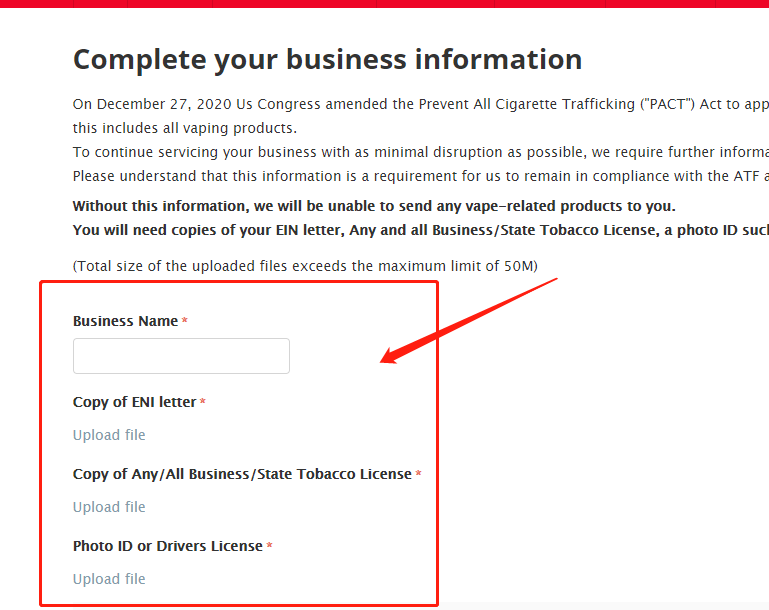
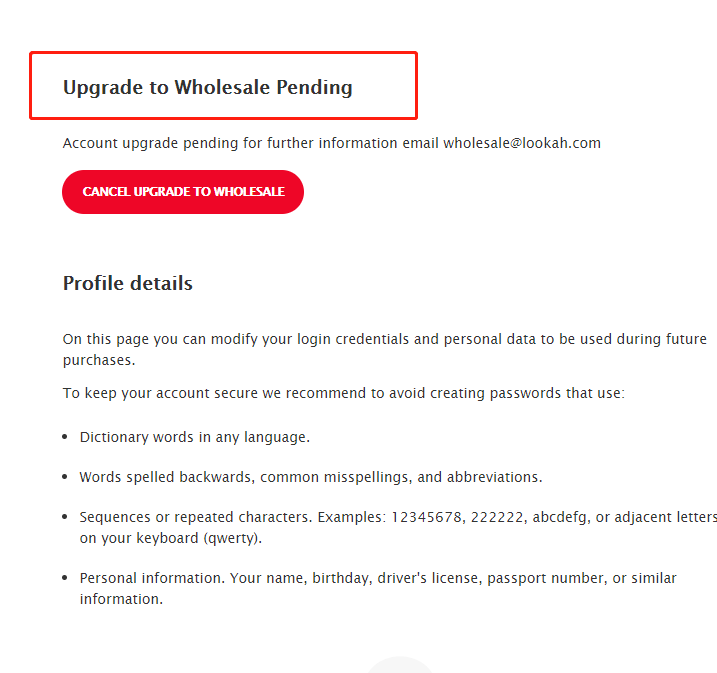
How to upgrade to a Store or Wholesale account
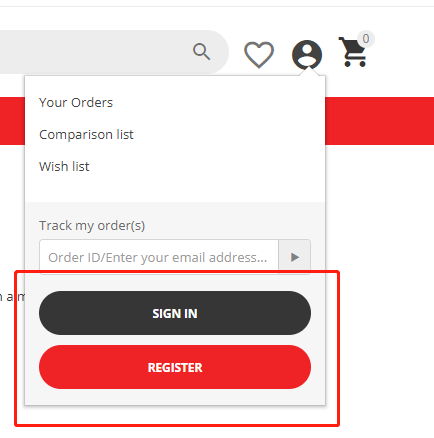
a) If you don’t already have an account then sign up for one by clicking the Register option from the account icon.
b) If you do have an account Sign In to it.

Lookah wants to limit e-waste generation. Our newer electronic vape products use Type-C USB ports, which many customers will already have.
This means we can cut down on needless extra cables and help the environment by not providing yet another lead that many consumers will already have and that will end up in a landfill.
Lookah doesn't make USB cables, so this measure also saves on the production, purchase, and shipping of those cables to be included with the devices. We then pass on those savings to the customers by offering the products at a lower price.
Shipping
We will ship any orders costing $50+ for free within the lower 48 US States (plus the District of Columbia).
Note:- This offer is not applicable to wholesale and store accounts and does not apply to any products or orders with a price lowered under $50 by a promotion or gift certificate.
Please allow 1 business day for the processing of orders.
Shipping takes approximately 5-7 business days from when the order is processed.
Over 95% of orders are delivered within this period.
Shipping is based on the postage destination as well as the weight and size of the parcel. Guest and Retail account orders over $50 qualify for free shipping.
Most other parcels sent within the USA can be sent for $19.90 USD. However larger packages with multiple items may cost more. Shipping is calculated on the checkout page after the destination is entered.
